By [crypto]
Real Deep web Contributor
PGP has been around for decades, but it is still one of the most respected ways to protect the contents of a message. In a world full of apps that promise privacy, OpenPGP remains one of the best-known standards for encrypted email and encrypted text exchange across platforms. The OpenPGP project describes it as a non-proprietary standard for authenticating and encrypting data with public-key cryptography, and its current standard is defined in RFC 9580.
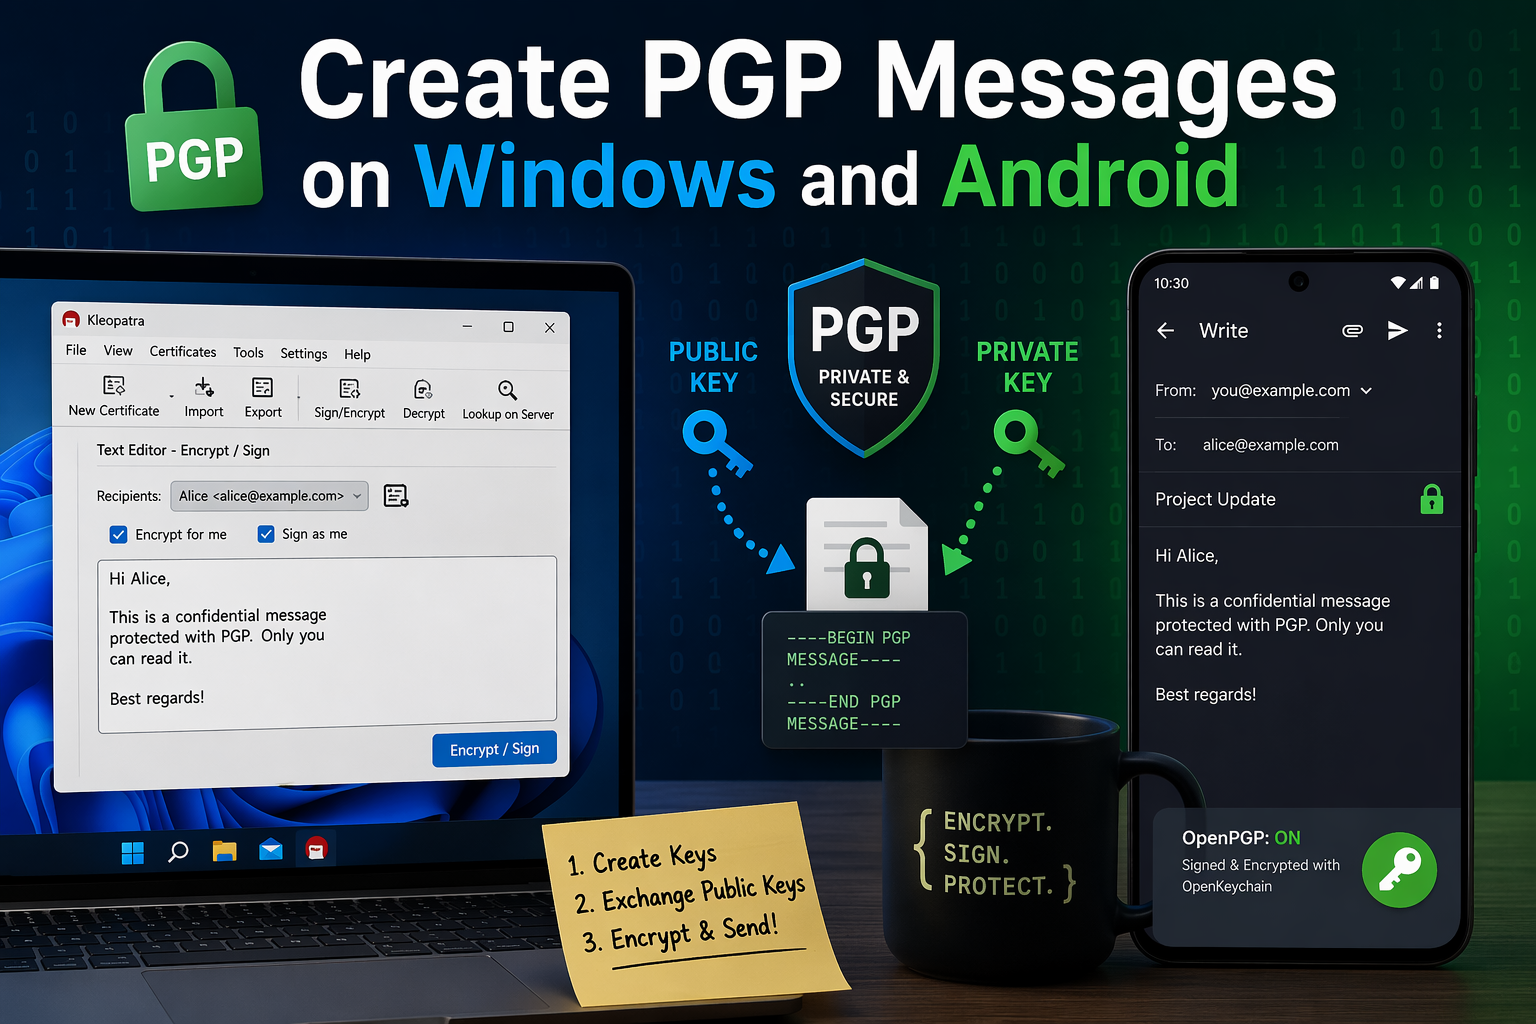
At a basic level, PGP works with two keys: a public key, which you share with other people, and a private key, which stays with you. Someone uses your public key to encrypt a message for you, and only your private key can decrypt it. PGP can also digitally sign messages, which lets the recipient verify that the message really came from you and was not altered along the way.
For Windows, the clearest current route is Gpg4win with Kleopatra. For Android, Mozilla’s official Thunderbird for Android OpenKeychain as the OpenPGP provider.
Windows is still the easiest place to learn PGP properly.
What PGP actually is, in plain English
Think of PGP as a locked mailbox system. Your public key is the slot anyone can use to drop a message into your mailbox. Your private key is the only thing that opens that mailbox. That means anyone can encrypt a message to you, but only you can read it. And when you sign a message with your private key, other people can verify the signature using your public key.
The part that trips people up is that PGP is not magic. It does not remove the need for trust. You still have to make sure the public key you imported really belongs to the person you think it belongs to. That is why fingerprints matter so much. Gpg4win’s documentation specifically emphasizes checking the other certificate’s fingerprint when you want to verify authenticity.
Before you begin
There are three rules worth understanding before you touch anything.
First, your private key is everything. If you lose it, or forget the passphrase protecting it, there is no recovery button waiting for you in the cloud. Gpg4win’s documentation strongly recommends exporting a backup of the private certificate, especially when moving to another machine or saving it to backup media.
Second, you cannot encrypt to someone unless you have their public key. Mozilla’s Thunderbird for Android guide makes this explicit: before sending someone an end-to-end encrypted email, you need their public key, and they need yours.
Third, importing a key is not the same as trusting it. The whole point of verifying a fingerprint is to avoid encrypting messages to an impostor’s key.
How to create PGP messages on Windows
On Windows, the most practical setup today is Gpg4win, which bundles Kleopatra as its key manager and encryption interface. Gpg4win 5.0.2 is the current release, and version 5 also updated Kleopatra’s interface, including a redesigned notepad that now opens in a separate window.
Step 1: Install Gpg4win
Download and install Gpg4win. It is the main Windows package for GnuPG-based encryption tools, and the current installer keeps your keys and configuration if you are updating from an older version.
Once installed, open Kleopatra. This is where you will create your key pair, import other people’s public keys, and encrypt or sign messages.
Step 2: Create your own key pair
Inside Kleopatra, create a new certificate and choose Create personal OpenPGP key pair. Gpg4win’s documentation describes this exact flow: you enter your name and email address, review the settings, and then create the key. You will then be prompted to choose a passphrase to protect your private key.
Use a passphrase you will actually remember, but make it strong. This is the password that protects your private key. If someone gets your private key file but does not know the passphrase, that extra layer still matters.
Step 3: Back up your private key immediately
This is one of the most important parts of the entire process. Gpg4win’s documentation says you should export your private certificate whenever you want to transfer it to another machine or save it to backup media, and it recommends making that backup copy during or after key creation.
Store that backup somewhere safe. A second encrypted USB drive is a far better idea than leaving your only copy on one laptop and hoping for the best.
Step 4: Export your public key
Now export your public key, which is the part you actually share. Gpg4win explains that you can export the certificate from Kleopatra and send that file to the people you correspond with. This is typically saved as an armored text file such as .asc, which is easy to email or attach.
This public key is what allows someone else to encrypt a message that only you can read.
Step 5: Import the other person’s public key
When someone sends you their public key, import it into Kleopatra. Gpg4win’s documentation gives the path directly: File → Import certificate… and then choose the saved public certificate file.
Once imported, that key becomes available as a recipient key for encryption.
Step 6: Verify the fingerprint before trusting the key
This is the part many beginners skip, and it is exactly where mistakes become dangerous. Gpg4win’s certificate inspection guidance says that when you want to confirm authenticity, you check the fingerprint of the other certificate. (Gpg4win)
In practice, that means you compare the fingerprint shown in Kleopatra with the fingerprint the other person gives you through another channel, such as a phone call, a verified website, or an already trusted conversation. If those fingerprints do not match, stop there.
Step 7: Write and encrypt your message
At this point, you are ready to create your first PGP message.
You can do this in Kleopatra’s notepad-style interface or by encrypting a text file. Gpg4win’s version 5 notes say the notepad was redesigned and now opens in a separate window, which makes it easier to work with plain text.
The basic workflow is simple:
- Write your message.
- Choose the recipient’s public key.
- Select whether you want to encrypt, sign, or both.
- Generate the encrypted output.
If you encrypt only, the recipient can read it but cannot automatically prove it came from you. If you sign only, they can verify it came from you, but the content is still readable. If you both sign and encrypt, you get confidentiality and authenticity together. That is the classic PGP workflow.
Step 8: Decrypt a message sent to you
When someone sends you a PGP-encrypted file or block of text, open it in Kleopatra and decrypt it with your private key. If the content was encrypted to your public key, Kleopatra will prompt for your passphrase and reveal the message. If the sender also signed it, Kleopatra can verify that signature as well.
How to create PGP messages on Android
Android is a little more complicated, but still very usable. Mozilla’s official documentation for Thunderbird for Android explains how to pair the app with OpenKeychain to send and receive signed or encrypted email.
Step 1: Install Thunderbird for Android and OpenKeychain
Start by installing Thunderbird for Android and OpenKeychain. Mozilla’s help article says OpenKeychain must be installed first if it is not already on the device, and then enabled inside Thunderbird for Android.
Step 2: Enable OpenPGP in Thunderbird
Open Thunderbird for Android, go to Settings, tap the email account you want to use, then open End-to-end encryption. Mozilla’s guide says to switch Enable OpenPGP support on. Once you do that, Configure end-to-end key becomes available.
This is the bridge between Thunderbird and OpenKeychain.
Step 3: Create a key or import one you already have
Mozilla’s instructions say that after tapping Configure end-to-end key, OpenKeychain will appear and give you two options: create a new key for a new address, or use a key you already have.
For most people, creating the main key on Windows first is the smarter move. Desktop is easier for backups, easier for exporting, and generally better for learning how your key setup works. Then, once that is stable, you can bring the same identity over to Android.
Step 4: Transfer your existing key to Android carefully
OpenKeychain’s FAQ is very clear here: if you need to transfer your own secret key to Android, the safest practical method is to export it from GPG and encrypt that export with a strong, one-time password before moving it to the phone. Its FAQ specifically recommends generating a strong random password, symmetrically encrypting the exported secret key, transferring the file, and then manually entering the one-time password on the phone during import.
That advice exists for a reason: your private key should never be moved around casually as an unprotected attachment.
Step 5: Exchange public keys with your contact
Mozilla’s guide says you need the other person’s public key before you can send them end-to-end encrypted email, and they need yours as well. It also lists several possible ways to exchange public keys, including in person, from a personal website, or through other trust-based methods.
As on Windows, the real security comes from verifying the key you imported, not just collecting it.
Step 6: Compose an encrypted message
Once OpenKeychain is configured and the recipient’s public key is available, Thunderbird for Android will let you enable encryption while composing. Mozilla’s instructions explain that the compose screen includes a lock icon. If it does not appear, that typically means OpenKeychain does not yet know a suitable key for the recipient.
Tap the lock to enable encryption. Thunderbird for Android can also sign the message, which gives the recipient proof of origin in addition to confidentiality.
Step 7: Send a signed but unencrypted message, if needed
Sometimes you do not need secrecy; you just need proof that the message really came from you. Mozilla’s guide includes a separate path for this. First, disable Hide unencrypted signatures in the account settings, then while composing, use the menu to enable PGP Sign-Only mode.
That is useful when authenticity matters more than hiding the text itself.
Step 8: Read encrypted PGP mail on Android
Mozilla’s support article also covers receiving encrypted and signed email. Once Thunderbird for Android and OpenKeychain are set up correctly, incoming encrypted mail can be decrypted on the device, and signed messages can be verified so you can inspect their security status.
The mistakes that cause the most trouble
The biggest mistake is treating your private key like a normal file. It is not. Lose it, leak it, or forget its passphrase, and your whole setup breaks or becomes unsafe. That is why backup and secure storage are not optional extras.
The second mistake is assuming a key is real because it has the right email address on it. PGP only works well when you verify identities properly. Fingerprints are not a nerdy extra; they are the part that keeps you from encrypting a message to the wrong person.
The third mistake is expecting Android to feel as polished as Windows. Mozilla still documents the Android workflow, so it is valid, but OpenKeychain’s own maintainers say it is no longer actively developed. That does not mean it is unusable. It means you should go in with realistic expectations and treat Windows as your main control center.
Final thoughts
PGP is not the easiest privacy tool to learn, but it is still one of the most powerful. Once you understand public keys, private keys, fingerprints, and signatures, the whole system starts to make sense. And once it clicks, you can use it across platforms without locking yourself into one company’s messaging ecosystem. OpenPGP remains a current standard, and both Windows and Android still have workable paths for using it today.
The easiest way to start is to build your setup on Windows first with Gpg4win and Kleopatra, exchange public keys with one trusted contact, verify fingerprints, and send a few test messages before moving your setup to Android. That approach is slower, but it is also the one least likely to end in confusion.